Thursday, December 23, 2010
Audacity_Mixing Songs.
My theme was hope. The three songs I used was "Breathless" by Taylor Swift, "Let it be", a Beatles cover, by Jennifer Hudson, "Lean on me" covered by Sheryl Crow, Keith Urban, and Kid Rock. I found these on google on a Hope for Haiti website and I felt they were the perfect songs for my project. I chose these songs because they were very inspirational and were clearly about hope and believing. When combining the songs, I took bits and pieces from each to make it sound like they were singing together in one song. I used fade in and fade out to make it sound as if they were passing each solo to the next person.
Wednesday, December 1, 2010
Friday, November 19, 2010
Website Pages
 I tried to make my homepage simple, creative, and colorful. With that I used the rectangle tool to create the colorful boxes. Then I added the Ipod heart from google to represent Multimedia Design. Finally, I added the text and saved.
 I then deleted the heart, and began to create my bio page. I made a black star with the shapes tool and typed the word "Bio" in white inside with the text tool. Finally, I added in my Bio and saved once again.
 Finally, I deleted everything but the star and the design once again. Next, with the type tool, I wrote the word "Projects" inside the star in white. Then, I searched two photos on google to represent Photoshop and Illustrator. After, I placed them onto my page and drew a rectangle and a line between them to make both pop out and saved.
Wednesday, November 10, 2010
Photoshop: Photo Montage
 First I searched a fantasy-like picture on google. Then, I saved the picture. After that, I opened it up to photoshop.
 Then, I opened the picture of my Grandfather and I to photoshop.
Finally, I added the picture of my Grandfather and I to the background picture. I erased around the picture of my Grandfather and I so it looked like we were in the background picture. After, I added text which says, "RIP Grandpa may the angels always be with you".
Tuesday, November 9, 2010
Photoshop: Combination
 First, I opened a picture of outerspace that I found in google. Then, I added pictures of two giraffes and a dinosaur to the outerspace backround. After, I used the layer mask tool to erase and make the giraffes and dinosaur look like they are in outerspace. Finally using the feather tool, I feathered the edges of the picture.
Photoshop: Layer Mask
Tuesday, November 2, 2010
Photoshop Tennis: Panther
 Step 1: Sacha used magnetic lasso to cut out the Panther. Then, she added a back ground image from google. After that, she used the layer mask to make the panther look like it is really with the back ground. Finally she placed another image from google of a baby chicken, and she used layer mask once again to put it into the image.
Step 2: Next, I opened the image and added in a bird from google. Then, using layer mask, I made the bird look like it was in the image.
 Step 3: Sacha then went onto google and placed an image of a guy holding a hunting rifle. Then using layer mask, she made the guy look like as if he were in the photo. Along with that, she added a shot wound onto the panther from google as well. In addition, Michelle got a cabin image from google and used the layer mask to put it into the image.
Wednesday, October 13, 2010
Illustrator: Blood Drive Flyer

- First, I created the heading which reads Blood Drive in large bubbly letters using text. Then, I used the rectangle tool to create the background, and I made it a teal color. Using the star tool, I created two stars one bigger than the other. In the bigger one, I put information about where and when the event is going to be. In the smaller star, I put information about giving blood. Next, I used the color box to fill both the stars in with red, and I made the stroke color white to make it pop out.
- After that, I used the pen tool to create a needle. To make it took fun, cute, and not so scary I drew a face and heart, still using the pen tool. With the pen tool, I then made a band aid. Next, I put an important fact on the band aid in larger text so it catches the audience's eye. Then, with the pen tool once again, I created a pulse line. To the left of the pulse line I wrote my slogan, which is "You could save a life". Finally, I made the font big and highlighted the word "life" and made a bit bigger, then I made it red so it pops out.
- In my project I used several elements. One element I used was line. I used this element when creating my images with the pen tool. Another was color. I used the colors white, red, and teal so each object would pop out to the eye. Also, I used the element of shape. I used this element when I created my stars. Finally, when creating my flyer, I made sure I used space so everything was clear and not cramped up.
Wednesday, September 29, 2010
Illustrator: Path-Multimedia Design
Illustrator: Snowflake
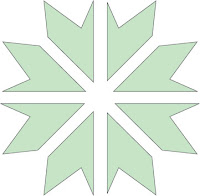
First, I clicked and held onto the rectangle tool and selected the star tool. Then, I created three different stars and put one in front of the other. Next, I selected all three stars and pressed the add symbol on the pathfinder tool. After that, I then made four equally sized rectangles and rotated them. Finally, I selected everything and pressed the subtract symbol on the pathfinder tool. My three stars then turned into a snowflake.
Tuesday, September 28, 2010
Illustrator: Path
Illustrator: Clipping Mask- Music
 Description:
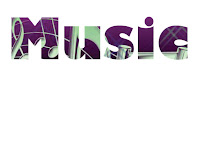
First, I went on google and searched music images. Next, I picked a colorful and music themed picture and saved it. Then, I went onto Adobe Illustrator and went to file and selected place. I clicked on the image I saved and used type to write Music on top of the image. After, I selected both items and then went to object, hovered over clipping mask, and clicked make. The text Music was then full of parts of the picture.
Illustrator: Clipping Mask-Name
Description:
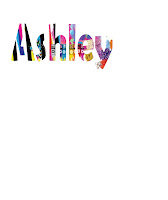
First, I found a colorful picture full of things I like and saved it. Then, I opened Adobe Illustrator and placed the image into the program. With the text tool, I wrote my name large and bold on top of the picture. Finally, I selected both items, I went to object, hovered over clipping mask, and clicked make. The text then was full of parts of the picture.
First, I found a colorful picture full of things I like and saved it. Then, I opened Adobe Illustrator and placed the image into the program. With the text tool, I wrote my name large and bold on top of the picture. Finally, I selected both items, I went to object, hovered over clipping mask, and clicked make. The text then was full of parts of the picture.
Illustrator: Shape
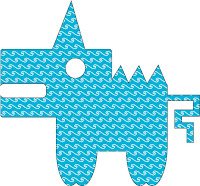
First, I created two equal sized rounded rectangles, selected both, and used the pathfinder to add the shapes. Next, I created four equal sized ovals and one smaller one. I put four of them close together in pairs and put the smaller one at the end of the rectangle. Then I selected all the shapes and used the pathfinder again to add all the shapes together. I then made a circle, three small triangles, and one bigger triangle. I put them into their right spots, then I added them all together, but with the circle I subtracted it from the image. Finally I made five different sized rectangles and put them together and added them to the image.
Monday, September 20, 2010
Welcome!
Hi! My name is Ashley Rubertone and I will be using this blog as a portfolio for my Multimedia Design class. I will be posting my project and examples along with a brief description of what I did. Please check back to see my work!
Subscribe to:
Comments (Atom)


